Start Selling with LaunchMyStore Today
Start your online business today and get everything you need to build, manage, and grow your online store.


Product Photography Tips for Ecommerce
 James Crawford
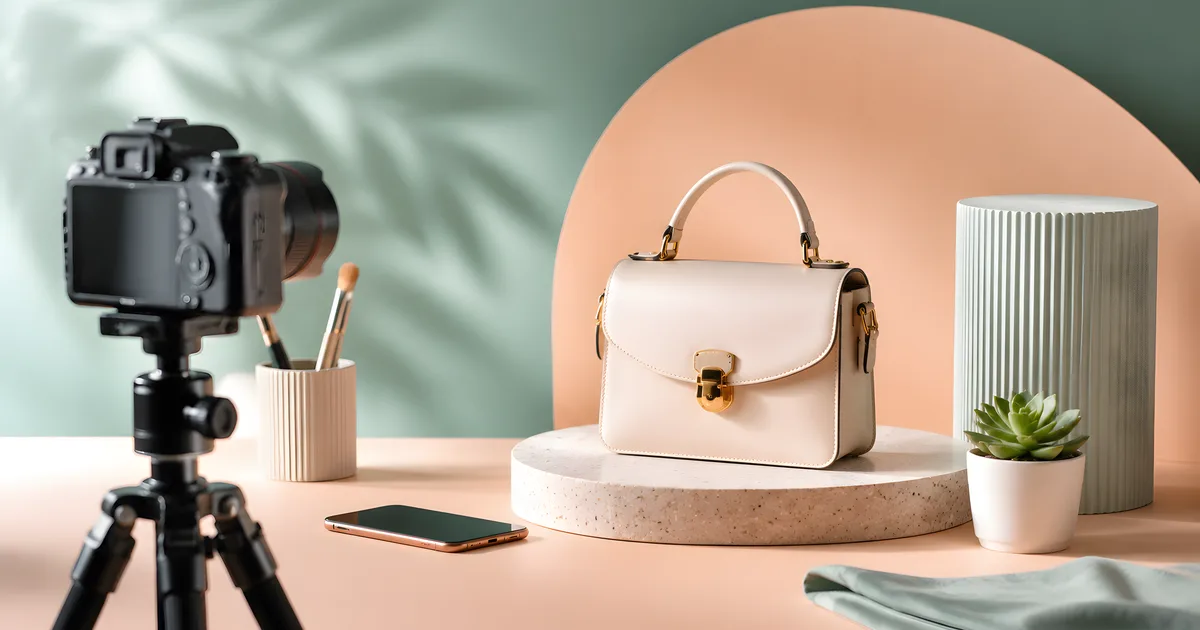
Start your online business today.
For free.
Start for freeGreat product photography does not require expensive equipment. A smartphone, natural window light, a $15 white backdrop, and free editing software can produce professional results. Focus on consistency, multiple angles, and lifestyle context shots. Stores with high-quality images see 94% more views and 30% higher conversion rates.
- Lighting accounts for 80% of a photo's quality, far more than camera gear, and free window light works best.
- Products on a pure white background get 25% more clicks than those on colored or cluttered backgrounds.
- Listings with 5-8 images convert 30% better than pages with only one or two product photos.
- A complete DIY photography setup costs just $55-$85 when you use your smartphone as the camera.
- Use WebP format and target 200-500KB per image to keep product pages loading under two seconds.
Why Does Product Photography Impact Sales So Dramatically?
According to Adobe Commerce (2024), stores with professional product photography receive 94% more views than those with amateur images. Salsify (2024) found that 75% of online shoppers rely on product photos when deciding whether to buy, ranking visual quality above price, reviews, and brand reputation. Etsy (2024) reports that listings with high-quality photos are 3.3 times more likely to sell than identical products with poor images. In ecommerce, your photos are your storefront; they are the closest thing a customer gets to holding your product before committing their money.
The good news is that professional-looking product photos no longer require a $5,000 camera and a rented studio. Modern smartphones have cameras that rival entry-level DSLRs for product photography. The difference between a photo that sells and a photo that repels buyers comes down to lighting, composition, and consistency, all of which you can master with the techniques covered in this guide. Whether you sell handmade jewelry, clothing, electronics, or food products, these 10 tips will elevate your product imagery immediately.
How Product Image Quality Affects Buyer Behavior
Sources: Adobe Commerce, Salsify, Etsy, 2024
Tip 1: Master Natural Lighting on Zero Budget
According to professional product photographer Karl Taylor (2024), lighting accounts for 80% of a photo's quality, far more than camera equipment or post-processing. Natural window light is free, abundant, and produces soft, flattering illumination that makes products look their best. The key is positioning your product next to a large window that receives indirect sunlight, meaning the sun should not be shining directly through the glass onto your product. Direct sunlight creates harsh shadows and blown-out highlights that make products look cheap.
Setting Up Your Window Light Studio
Place a table next to your largest window. Position your product 2-3 feet from the glass, angled so the light falls across the product at roughly 45 degrees. On the opposite side of the product from the window, place a white foam board or piece of cardboard to bounce light back into the shadows. This $2 reflector eliminates the dark shadows that make DIY photos look amateurish. Shoot during the golden hours of late morning or early afternoon when the light is brightest but still soft and diffused through clouds or curtains.
Tip 2: Use a Clean, Consistent Background
According to Amazon Seller Central (2024), products photographed on a pure white background receive 25% more clicks than those on colored or cluttered backgrounds. White backgrounds are the industry standard for primary product images on every major marketplace and ecommerce platform because they eliminate visual distractions and put 100% of the viewer's focus on the product itself. A white background also ensures your product looks consistent across your catalog, building the professional cohesion that shoppers associate with trustworthy brands.
You do not need a professional backdrop stand. A large sheet of white poster board ($3-$5 at any craft store) curved from a wall onto your table surface creates a seamless "infinity curve" that eliminates the visible horizon line behind your product. For larger items, use a white bedsheet pinned to the wall. The curve is essential because it removes the hard line where the wall meets the table, creating the illusion of infinite white space behind and below your product.
Tip 3: Shoot From Multiple Angles
Salsify (2024) found that product pages with 5-8 images convert 30% better than pages with only 1-2 images. Shoppers cannot physically handle your product, so your photos must replicate the experience of turning the item over in their hands. Every product listing should include a front-facing hero shot, a 45-degree angle, a side profile, a back view, a close-up of textures or details, and at least one lifestyle shot showing the product in use. This multi-angle approach answers visual questions that would otherwise become support tickets or reasons to abandon the purchase.
Essential Shot List for Every Product
- Hero shot: Straight-on, centered, white background. This is your primary catalog image and the first thing shoppers see in search results and category pages.
- 45-degree angle: Shows depth and dimension that a flat front-on shot cannot convey. Particularly important for products with interesting shapes or textures.
- Detail close-up: Zoom in on the craftsmanship, texture, stitching, material quality, or any unique feature that differentiates your product from competitors.
- Scale reference: Show the product next to a common object (a hand, a coin, a ruler) or in a room setting so shoppers understand the actual size. According to Baymard Institute (2024), unclear product size is the #4 reason for returns.
- Lifestyle shot: Show the product being used by a real person in a real environment. This helps shoppers envision ownership and creates an emotional connection that white-background shots cannot achieve.
- Packaging shot: Show the product in its packaging if the unboxing experience is part of your brand value proposition. This is especially important for gift-oriented products.
Tip 4: Invest in a Simple Tripod or Phone Mount
Camera shake is the most common cause of blurry, unprofessional product photos, and it is 100% preventable with a $15-$25 tripod. According to DPReview (2024), handheld photos taken in typical indoor lighting conditions lose 30-40% of their sharpness compared to tripod-mounted shots. A tripod also ensures consistency across your product catalog; every image is taken from the same height and angle, creating the visual uniformity that makes your store look polished and professional rather than like a garage sale listing.
For smartphone users, a $20 phone tripod with a Bluetooth remote shutter eliminates both camera shake and the awkward angle that comes from reaching to tap the screen. For DSLR or mirrorless users, any tripod rated for your camera's weight will work. Set a 2-second timer or use a remote trigger so that pressing the shutter button does not introduce vibrations to the camera body during the exposure.
Tip 5: Use Your Smartphone Like a Professional
According to Apple (2024), the iPhone 15 Pro's camera system rivals DSLR sensors that cost 10 times more in controlled lighting conditions. Samsung, Google Pixel, and other flagship smartphones have followed suit. For product photography, the limiting factor is rarely the camera hardware; it is the photographer's technique. Modern smartphones with computational photography can produce images that are indistinguishable from $2,000 camera setups when you follow a few key practices.
Smartphone Photography Settings
- Use the rear camera only: The front-facing selfie camera has a smaller sensor and worse lens optics. Always use the main rear camera for product shots.
- Lock exposure and focus: Tap and hold on your product to lock the autofocus and auto-exposure. This prevents the camera from shifting focus or brightness between shots, ensuring consistency.
- Turn off flash: The built-in flash creates harsh, unflattering light with hard shadows. Always use natural light or a continuous light source instead.
- Shoot in the highest resolution: Enable maximum resolution in your camera settings. Storage is cheap; you can always compress later, but you cannot add detail to a low-resolution image after the fact.
- Use the 2x zoom: Instead of getting physically close (which causes distortion), stand back and use the 2x optical zoom to flatten perspective and avoid the "fisheye" warping that makes products look strange.
Tip 6: Create Lifestyle Photos That Tell a Story
According to Shopify (2024), product listings that include lifestyle images alongside white-background shots see 32% higher add-to-cart rates. Lifestyle photos work because they help the buyer visualize ownership: a candle glowing on a nightstand, a bag slung over someone's shoulder, a kitchen gadget in action on a real countertop. They transform a product from an object into an experience, triggering the emotional response that drives purchasing decisions. BigCommerce (2024) found that lifestyle imagery increases time-on-page by 45%, giving you more opportunity to convert the visitor.
You do not need a professional model or a rented apartment. Use your own hands, your kitchen, your desk, or your living room as a backdrop. Recruit a friend for body-worn products. The goal is authenticity, not perfection. Today's consumers actually prefer real-looking lifestyle images over hyper-polished studio shots. According to Stackla (2024), 86% of consumers say authenticity is a key factor when deciding which brands to support, and candid lifestyle photos read as more genuine than overly produced imagery.
Tip 7: Edit Photos for Consistency and Polish
According to Pixc (2024), edited product photos outperform unedited photos by 38% in A/B tests measuring click-through rate. Editing does not mean heavy-handed filters or artificial enhancements; it means correcting white balance so whites look truly white, adjusting exposure so the product is neither too dark nor washed out, and removing background imperfections that distract from the product. Consistency in editing is as important as the edits themselves: every image in your catalog should have the same brightness, contrast, and color temperature.
Free Editing Tools That Deliver Professional Results
- Canva: Offers background removal, basic adjustments, and batch editing for free. The Pro plan ($12.99/month) adds AI-powered enhancement tools.
- GIMP: A free, open-source alternative to Photoshop with professional-grade tools for color correction, background removal, and retouching.
- Snapseed (mobile): Google's free mobile editing app with selective adjustment, healing brush, and a "white balance" tool that fixes color casts in two taps.
- Remove.bg: A free online tool that removes backgrounds from product photos instantly using AI. It handles complex edges like hair, fur, and transparent objects surprisingly well.
Tip 8: Optimize Image Files for Web Performance
According to HTTP Archive (2024), images account for 45% of the average web page's total weight, making them the single largest factor in site load time. Google (2024) reports that 53% of mobile visitors abandon a page that takes longer than 3 seconds to load, and each additional 0.5 seconds of load time reduces conversion by 20% per Akamai (2024). You need to balance image quality with file size to ensure your product pages load instantly on every device and connection speed, including mobile networks in rural areas.
Image Optimization Best Practices
- Use WebP format: WebP files are 25-35% smaller than equivalent JPEGs at the same visual quality per Google (2024). Most modern browsers support WebP, and platforms like LaunchMyStore and Shopify auto-convert uploaded images.
- Target 200-500KB per image: This delivers crisp visuals on retina displays while keeping page load times under 2 seconds even on 3G connections.
- Set dimensions to 2000x2000px for primary images: This provides enough resolution for zoom functionality without being unnecessarily large. Save lifestyle and secondary images at 1200x800px.
- Compress with TinyPNG or Squoosh: These free tools reduce file size by 50-80% with imperceptible quality loss, automating the compression process that would take hours manually.
- Add descriptive alt text: Every product image needs an alt attribute describing the product for screen readers and SEO. According to Moz (2024), images with descriptive alt text rank 10% higher in Google Image search results.
For more on optimizing your overall store performance, see our SEO for ecommerce guide.
Tip 9: Create a Photography Style Guide for Consistency
According to Lucidpress (2024), consistent brand presentation across all channels increases revenue by 33%. In product photography, consistency means every image in your catalog uses the same lighting angle, the same background, the same margin around the product, and the same color profile. When a shopper browses your category page and sees a grid of perfectly uniform product images, it signals professionalism and trustworthiness. When images vary wildly in brightness, background color, and cropping, it signals a disorganized business that may not deliver a reliable experience.
What to Include in Your Style Guide
- Lighting setup: Document your exact window position, reflector placement, and time of day so you can reproduce the same look for new products added months later.
- Camera settings: Record your zoom level, exposure compensation, and white balance setting. On a smartphone, screenshot your locked exposure point.
- Composition rules: Define the product's position in the frame (centered, 60% of frame height), the margin around it, and the angle for each required shot type.
- Editing presets: Save your editing adjustments as a preset or template in your editing app so every image receives identical color correction and exposure adjustments.
- File naming convention: Use a consistent naming structure like "product-name-angle-number.webp" so you can quickly identify and organize thousands of images as your catalog grows.
Tip 10: Use Product Photos to Tell Your Brand Story
According to Shopify (2024), brands that use photography to communicate their values and story see 25% higher customer lifetime value than brands that treat photos as purely functional catalog images. Your product photography is a branding tool, not just a documentation tool. The colors, props, backgrounds, and mood of your lifestyle images should reinforce your brand identity. A luxury skincare brand uses marble surfaces, soft lighting, and minimalist compositions. A rugged outdoor brand uses natural textures, harsh directional light, and weathered props. The visual language tells the customer who this product is for before they read a single word.
For more on building a cohesive visual brand identity, read our guide on building brand identity for your ecommerce business. And to pair your photos with descriptions that convert, check out our guide to writing product descriptions that sell.
Budget Breakdown: DIY Product Photography Setup
Source: LaunchMyStore research, 2025
Frequently Asked Questions
Can I use a smartphone for professional product photography?
Yes. Modern flagship smartphones from Apple, Samsung, and Google produce product images that are indistinguishable from DSLR photos in controlled lighting conditions, according to DPReview (2024). The key is using the rear camera, locking exposure and focus, using a tripod, and shooting in natural light. Post-processing in free apps like Snapseed can further close the gap.
What is the best background color for product photos?
White is the industry standard and is required by Amazon, Google Shopping, and most marketplaces for primary listing images. White backgrounds eliminate distractions, ensure consistent catalog appearance, and make products pop. For lifestyle images, use backgrounds that complement your brand aesthetic. According to Amazon Seller Central (2024), white-background images get 25% more clicks.
How many photos should each product listing have?
According to Salsify (2024), the optimal range is 5-8 images per product. Include a hero shot, 45-degree angle, detail close-up, scale reference, and at least one lifestyle image. Products with 5+ images convert 30% better than those with 1-2. High-ticket items benefit from even more angles and detail shots to justify the purchase price.
Do I need to hire a professional photographer?
Not when starting out. The DIY techniques in this guide produce results that are 80-90% as good as professional studio work for a fraction of the cost. Once your store generates consistent revenue, reinvesting $200-$500 per session in a professional photographer can elevate your brand further. Focus your early budget on inventory and marketing instead of photography outsourcing.
How do I remove backgrounds from product photos for free?
Remove.bg is the fastest free tool for automatic background removal using AI. It handles complex edges like hair, jewelry, and transparent objects well. For manual control, GIMP (free desktop software) and Canva both offer background removal tools. LaunchMyStore and Shopify also include built-in background removal in their image editors, so you can clean up photos directly in your product dashboard.
Written by
James Crawford
Ecommerce Specialist at LaunchMyStore. Helping online businesses scale with data-driven strategies and the latest ecommerce best practices.
 Keep Reading